Wood interior Total Page Hits: 4337
Post Type: Technical/Project
Boat Part: Cabin/Storage
Date Modified: 07/02/2019 10:35 PM
**This is turning out to be an ongoing journal of the project for me. Might be hard to follow. When I'm done, provided the project turns out well, I'll try to clean it up. In the meantime, I suspect that if I don't write it down as I go I won't ever. So pardon the mess.**
This winter I'm embarking on recreating the wood interior that my father put in our last M17, Little Breeze. That boat came to him with some woodwork done, but he added more. He also didn't take a single photo, so we're kind of starting over from scratch.
I have a great love of sitting down below in boats. The worse the weather, the better (within reason). I like the layout of the M17, but I find the rough fiberglass unappealing. Little Breeze had a warm glow down below that I'm hoping to recreate. I have no designs on hiding all the fiberglass, which would be nearly impossible.
My plan is a wood ceiling on the top, the sides of the cabin, and the sides of the hull.
11/10/17
I decided to use western red cedar for its easy working, lightness, color, and odor. The planks will be finished and varnished individually outside of the boat.
I had initially thought of using plywood for the stringers on the roof that the planks would screw to. My father suggested cedar for that, too, and that turned out to be correct. Being able to easily work the wood with a Japanese saw right inside the boat has made it significantly easier and faster. I started out by doing a test in which I screwed a #6 screw into a half inch of WRC. I gave it 50 pounds of tension and it didn't come out. That should certainly be enough for the project.
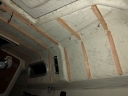
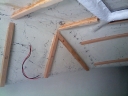
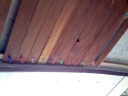
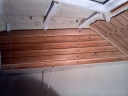
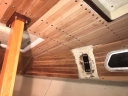
We ripped some clear cedar into 3/4" x 1/4" strips, then I epoxied those to the ceiling. I used thickened West System epoxy, since the ceiling isn't very smooth and there were small gaps to fill. On one of the strips I cut a notch out to accommodate a bump in the fiberglass, but mostly they didn't need it. In retrospect, I could have used less epoxy (there's only so much strength needed here) and could have just "tacked" the pieces. It wouldn't have saved me any epoxy, since I only have seven clamps and so run out of clamps before I run out of epoxy with each batch. But someday someone may want to rip it all out. The cedar will come out easily, of course, but the epoxy will be harder. Too late.
The second layer I also put it with epoxy, this time unthickened. This could have been Titebond III, which I actually did use on the very final few pieces, as I got tired of throwing out 3/4 of a batch of epoxy. When I do the sides, it'll be epoxy for the first piece (to the fiberglass), then Titebond III from there.
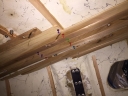
Where I'm at now (and I'll update as it goes), I have all of the ceiling stringers put in. They're just over 1/2" apiece, with a few bumped out an extra 1/8" close to the fore hatch coaming (which is a bit uneven).
The thickness of the stringers was dictated by the need for the stringers of the top and the sides to meet. The cabin has a fairly large radius curve that my stringers needed to turn into a single hard chine. I did some experimenting with balsa and originally thought I was needing 3/4", but after getting 1/2" I discovered that they would meet.
The loss of headroom is kind of theoretical. The ceiling will bring it down to the level of the lowest protrusions (the forehatch coamings, for instance), minus the 1/8" thickness. I can live with that.
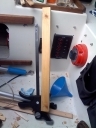
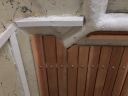
Next step is completing a new compression post. We've got the top base for it (from mahogany) almost ready to fit. The post will be doug fir. Then I'll start epoxying stringers to the sides of the roof. I'm expecting a bit of shenanigans with bracing those. The overhead ones were easy, I'm expecting these will want to move around. I may try 3M mounting tape to put blocks around the stringers to keep them from sliding while the epoxy sets.
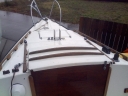
Attendant to all this is installing some new deck hardware (for a Cunningham and outhaul run back to the cockpit) and sealing up old, unused holes in the roof. I removed the mast step and had some loops welded on the outsides so that I could remove a couple of standup blocks that were leading halyards back. Also some navigation lights on the sides of the cabin (it currently has a post style light on the foredeck, but that can't be used with a sail hanked to the forestay). I want all of that done so I don't have to take any of the ceiling out again soon.
11/12/17
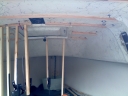
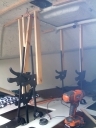
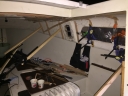
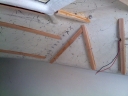
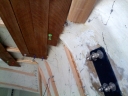
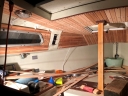
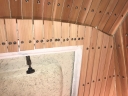
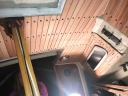
I epoxied in the stringers on the starboard side of the cabin. They are all two layers of 1/4" WRC stock. When I was test fitting I found that they didn't need to bend, so I was able to build them up on a work bench. I took each piece and shaped it with saw and knife to fit into the curve of the cabin. Then I shaped the second layer also, then marked where the two fit each other and where the first layer fit into the boat.
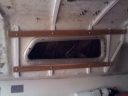
I glued the pieces up on the workbench, this time with Titebond III. Once they'd set up I clamped them into the boat. I was actually a little surprised how easily they went in. As you can see in the pictures, the big pieces in the front I braced with the same clamps I'd used on the ceiling. The openings in the berth make good places to brace against.
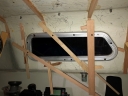
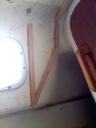
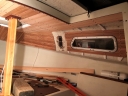
All the pieces around the window were made easy by the starboard window already being out. I was able to just clamp them with regular old clamps.
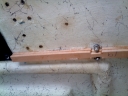
There was one piece, the aft most, that was a bit of a wingnut. Only four or five inches long and not close to anything for clamping. I ended up clamping a stick to something mounted on the bulkhead, then pinning the stringer with that stick. With no curve in the pieces, though, they don't need to be clamped super tight. Once again, how much strength is really required here, right?
I also test fitted some ceiling pieces. I just ripped a 2x4 thin (like 1/16 to 1/8) and thumbtacked the pieces up to get an idea. Once I've got the sides in I'll do the same there and it'll give me a better idea of how to tackle the corners.
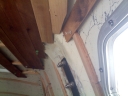
The other obvious problem area is going to be the raised fiberglass around the chainplates, where it's cored. The side pieces should go over them, but the centers and the tops where they curve into the ceiling will require some kind of separate covers.
11/14/17
The port side stringers are now in. These were more difficult for a couple of reasons. First, the window still being in meant that clamping the small pieces around it wouldn't just be like the other side. Second, where the starboard side was almost completely flat, the inside on the port was a bit concave. The long spreader clamps on the other side really just held the pieces in place while the epoxy worked its magic.
I realized that I wouldn't be able to get enough power out of the clamps to force the stringers to bend with the concave surface. There was just nowhere to seat them to get the right 90 degree angle. Instead I laminated the pieces on the workbench (Titebond III again) and then epoxied them in full thickness. The concavity wasn't significant enough to cause a problem; I used thickened epoxy to bridge the small gap.
The small pieces around the window were a bigger clamping problem. Ultimately, I unscrewed the screws that hold on the frame to the window, then mounted pieces criss-crossing the window. I stuck the small stringers under these pieces, then shimmed with scrap wood until the bend of the criss-crossing pieces held them in place. It worked shockingly well.
With both, a big part of it was that I used adhesive filler (West System 403) and mixed it to the consistency of thick peanut butter. Plus, it was fast hardener and I had the interior heated pretty well with a space heater. The most difficult of the pieces was a three inch long bit at the furthest aft corner of the starboard side. I essentially stuck it to the fiberglass with this thick mixture, then leaned a clamp against in braced in the sink. No real clamping. Better living through chemistry.
Close to all the stringers for the ceiling are up now. The front face of the cabin needs some, but it's a compound curve so I have to figure out how exactly to do it. It's also where several different panels join and I have to puzzle out how to accomplish that. As with most of the project so far, I think it's going to be a matter of actually starting, then solving the problem. I'll cut some ceiling boards to the actual size and mount them up there to see exactly how everything will meet.
It's also clear now that I'll have to just panel the sides right up to the chain plate areas, covering as much as I can, then figure out just what kind of panel will cover the chain plates. Maybe small pieces of mahogany ply. And some brass fasteners to make it look like a bar.
The weather is worsening, so I will probably epoxy the stringers into the sides of the hull as soon as I can, before it gets too hard to keep the inside warm. Once the epoxy work is done, the rest should be mechanical (I plan on doing all the varnishing out of the boat, then installing).
Also waiting for a dry weather window to reinstall the compression post, tabernacle, and starboard window.
11/23/17
I've put in the stringers all along both sides and now in the front of the cabin top. All the cabin top hardware is mounted, as well as the tabernacle and the window. It's been absolutely pouring here, so I can definitely say no leaks anywhere (except at the very bottom of the keel, which is a different issue altogether).
Some interesting things I'm finding (some or all of which might be incredibly obvious):
The inside of the cabin is not very symmetrical. Not only is each side a separate issue as far as measurements, but all along the roof from side to side. At several stations I'm finding that, in order to make the ceiling pieces all lay flush on the forehatch coaming, for instance, the last layer of the stringer has to be sanded to various thicknesses at various places.
The decision to use cedar for the stringers is turning out to be absolutely critical. A harder to work wood wouldn't just make it more time consuming to fit the pieces (I can cut them right there in the cabin), but would make it nearly impossible to make modifications to pieces already epoxied in place.
Planning is only going so far. In a lot of places, particularly where the sides meet the top, or the front, etc, it's clear that the only way I'll figure out how to do it is to create the problems and then solve them. Chief among these is how to cover up the inevitably untidy seams at those junctions. I'm thinking that some sort of small facia piece will have to cover it. Everything is just too uneven to expect a good looking joint.
Ongoing considerations:
-What the actual planks that make up the ceiling will look like. I like broad pieces, maybe 1 1/4". There will be places where they'll end, obviously. I'm not sure right now if I'll use some sort of trim pieces, or if I'll finish the ends and make their terminus there look natural.
-I'm not sure yet if I'll start the line of the roof with the sides of the mainhatch coaming, the corners of the roof, the compression post top, or what. Or, most likely, all of them, then with "stealer" planks in the middle to even it out.
The new compression post is in also, with three coats of varnish on it. Looks great, though I'm not 100% sure that I got it plumb. As with everything else, the roof and the berth top are not perfectly parallel.
Next up, have to finish off all the wiring to prepare it to be covered. Then I'll start experimenting with the planks and fastenings.
11/25/17
Did some testing. I cut a western red cedar 2x4 into 9/64" thick strips, which is about the size I'm thinking of. Might go thicker, up to 3/16". Anyhow, I laid on a quick coat of varnish to see the color. The pieces are very rough looking, but a good approximation.
I thumb tacked them into place. On the roof there are (at least) four different not-quite-parallel lines to manage: the mainhatch coaming, the compression post top, the forehatch coaming, and the chine of the roof and side.
I started with the mainhatch and ran a 4' pieces as far forward as it would go. Then I laid one alongside the compression post top, then worked inward. The pieces weren't cut too carefully, so there's a little bow in them, but even so I found that I'd end up needing a slightly angular stealer to make them agree. The mainhatch and the forehatch coamings turned out to be very close to parallel. The chine obviously isn't. It all worked pretty well, though.
Several conclusions were made obvious by the testing:
1) the chainplates will have to be covered by something that bends to cover the curve at the top. Maybe 1/16" birch plywood acting as "covers". Maybe thin wood strips on the edges to cover the gaps between that plywood and the planks it's meeting.
2) the varnished WRC is too dark. I experimented with another piece and use a clear satin polyurethane finish. Better.
3) I had been going back and forth on laying trim pieces on the ends of all the planks, like a quarter round where the ends meet the mainhatch coaming, an L cross section piece on hanging edges, etc. And something over the "seams" between the sides, the top, the front, etc. Having put pieces on now, I'm thinking the answer is the pieces rounded and finished on the ends, then "floating" on the stringers. There's no need or desire to hide that it's a fiberglass boat underneath the wood. That will also mean gaps big enough to handle condensation.
12/01/17
I settled on Western Red Cedar for the ceiling, based in part on the reaction I got at the store when I asked for Port Orford Cedar.
I went through the bin of 2x4x8's at Home Depot and found two remarkably clear ones. With the configuration of knots in them, they'll still produce a few totally clear pieces each, and a whole bunch of smaller ones. Not bad for $12 boards. For $30 each I can get totally clear 2x4x8's, which I might have to do. I'll see if I can get by picking through the regular boards. This is a place where not all lumber stores are equal, as some are just set up for easier picking.
I found when I was putting the practice roof in that there are only a couple of places where the pieces need to be longer than four feet or so. Many pieces will only be six inches or less.
I also decided on easing the edges of each piece to make them rounded, and gap them ever so slightly. Not enough to make the interior visible, but enough to alleviate any problems with condensation. There will be no trim pieces either (except the chainplates, as above). Instead, the ends will all be rounded and dressed nicely.
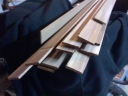
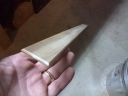
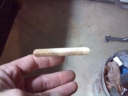
I ripped each board into 1/4" strips, full width (1 1/2"). Then I ran them through a thickness planer to get them down to just under 3/16". Finally, I ran each one over a round router bit to ease the edges. I got eight pieces out of the board I cut (a ninth was just the tiniest bit too thin, so I'm sure I could have made it nine with more care).
How much that will actually cover, and so how many boards I'll use, I haven't really got the foggiest idea. The project is going slowly, so I'll keep making them as I need them to avoid making too many.
Next question I'm mulling is how to finish them, outside of the boat on both sides, or inside the boat on just the outside. I think I'm going to use a water based product (polycrilic), so I won't choke myself to death if I do it inside.
12/06/17
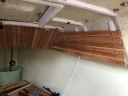
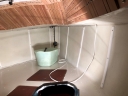
The first section is installed. The forward face of the cabin was first. Sorry for the lousy image quality below, but it gives the general idea.
I started by establishing the center line, more or less. I tied a light line to the bolts for the foredeck cleat, then brought it back to the center of the compression post. Then I started mounting the pieces from the center out. They are flush on the bottom with the plane of the foredeck. I didn't want them sticking down further and having things get caught on them.
They're gapped with a 1/16" thick washer. That allows you to see the rougher fiberglass underneath, but again, I didn't want to try to make all the older fiberglass disappear. That would be a much, much bigger job involving sanding, painting and epoxying.
On one side I ended up needing a piece cut at an angle as a stealer to bring them into line. Didn't on the other. I have no idea why that was the case.
A difficult area were the diagonal drain channels that go forward from the forehatch coaming. For the paneling to sit comfortably over them, I'd have had to set it all closer to 3/4" or an inch from the sides. I didn't think it was worth it. I won't know for certain until the ceiling is in, but I'll probably be looking at a small gap at each of them where that channel is visible. I still think its preferable that way.
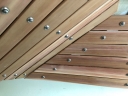
I ultimately went with stainless #6 oval head screws and finish washers. I like the way they look, they're not too expensive bought on Amazon, and the finish washers are forgiving covering up drilling mistakes. Brass is a little gaudy.
The boards aren't finished yet, either. I tried varnish on some test pieces but it came out too dark. I bought some water based polycrilic that I think I'll use. Clear, just matte finish.
12/09/17
Started the starboard side of the cabin. Easy going until I got nearer the top, where I had to start facing the need for some sort of stealer board. I want to avoid a whole bunch of differently shaped boards, so I think what I'll end up doing is cutting a single bigger plank from a 4x4. It'll be oversized, but its at the top so I don't think it will be bad visually.
12/15/17
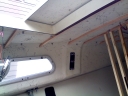
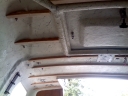
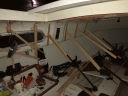
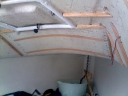
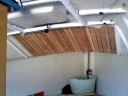
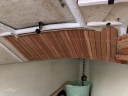
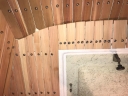
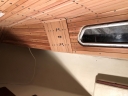
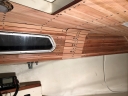
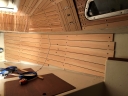
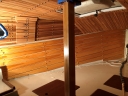
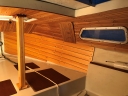
Finished all the standard sized boards on the starboard side and on the port side. Still remaining are the stealer boards to reconcile all the non parallel lines (see photos). Also started the curved pieces that go around the windows.
12/20/17
I finally ran out of the wood from the first 2x4s I ripped. I ripped a couple more clear ones I bought (for $30 apiece). I was a little surprised how different they were. Much, much wetter, for one thing. The color is also a lot lighter. The first two I got were that brownish, sometimes almost purple color that some WRC is. I realized that the last two pieces I still need to put in on the sides of the cabin will have to be from a similar piece of wood or they'll look strange.
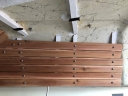
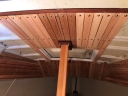
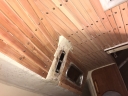
Anyhow, I got some of the top ceiling in.
12/21/17
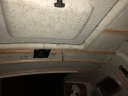
Almost all of the ceiling in now. I'm getting to some of the really funky corners and finding that patterns cut from cardboard are the only way to do it. Working overhead, laying on my back in the berth, is a really killer on the abs. But it's nearly done up there. Looks good. A whole lot of screws, obviously.
I'm hoping to be done before the frost really sets in and makes it unpleasant to work outside. Coating the wood will have to wait until Spring, but that's fine. Really shouldn't be that much work, anyway.
12/27/17
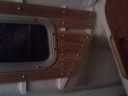
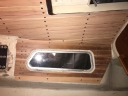
I'm essentially done with the paneling on the top part. I had to re-do a few pieces around the starboard side window. It was surprisingly hard to get the ends reliably lined up and I had a jagged edge there that I initially thought would be hidden by whatever covered the chainplates. I decided to clean up that end just to keep the chainplate solution more flexible.
You can also see where I ran out of my original, darker & harder pieces of wood and had to transition to the lighter colored stuff. Unfortunately there were two long pieces around the windows on either side that I had to make from the lighter stuff. I wish it looked better, but there you go. Obviously, because the pieces are only screwed on, if I ever happen to run into better pieces I can just screw them on.
The last area to be done was the forward edge of the forehatch coaming. It was extremely challenging. Lots of places that aren't actually very even once you put a straightedge on them. Ultimately what I did was make the stringer in front of the coaming curved. There are three layers of 1/4" wood laminated, then the final layer is about .2 inches on the ends, tapering to maybe .08 in the middle. It gives the front a bowed look that I think works from within the boat. As with everything else, it can be modified later if it doesn't work. That last, curved, layer, isn't epoxied in. Just held by the same screws holding the planks. So it can be altered easily.
I think the finishing will wait for better weather. I can get the inside of the boat plenty warm, but humidity is harder.
Next tasks are the chainplate covers. I don't honestly have any real idea what they'll look like. Right now I'm working on the fastening system that will hold something to them. I've tested a couple ideas that didn't work, I think I'll try 1/8" aluminum bar running side to side and fasted under the middle chainplate nuts. That bar will have threaded holes for 10-24 screws. The covers will attach with a couple screws going into those aluminum bars.
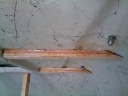
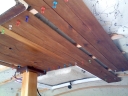
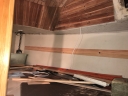
Task after that will be the sides of the hull in the berth. One of the photos below shows a piece of wood laid up there for testing. It's a 2x4 ripped down to about 3", then ripped about 3/16" thick. Just a kiln-dried stud (I'm not even certain what wood it is), but its reasonably clear and, of course, less than five bucks each.
01/06/18
The top is done, expect for the finish, which will wait for better weather.
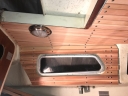
I spent a lot of time trying to figure out the panels that go over the chainplate areas. I did some mockups of horizontal slats and of vertical slats, but the mockups were too rough to get a good idea. Finally I made finished versions of each. Horizontal on the port side and vertical on the starboard side. For now I'm leaving them as they are, unmatching. If one side grows on me more than the other I'll make a second one.
The port side is based on a piece of 1/8" aluminum flat bar that runs vertically through three of the chainplate screws, then curves to meet the roof. The slats are mounted to it with machine screws into drilled & tapped holes.
The starboard side starts with two pieces of flat bar running horizontally, each one through two chainplate screws. Then the vertical slats are mounted to them, again with machine screws. The topmost piece that covers that gap up there is actually attached with a flap of very thin ply (1/32" or so) and glue.
I put a facia piece on the ends of the slats where they meet the mainhatch coaming. They were ragged back there. It looks much better.
Next up will be the slats along the sides of the berth. I've decided that the stringers that they screw into will mount into the liner with machine screws into 8-32 holes tapped into the plastic. Three screws per stringer should work. The stringers will be 1/4" plywood painted white.
Compared to the top, the sides should be really easy.
01/13/18
************** Public Service Announcement ****************
If, by some insane chance, you're following along and doing the same thing to your boat, I discovered a problem with my method so far.
I drilled the stringers on the lower pieces right into the liner of the berth. This worked just fine for almost all of them, but two went right through the hull. It was in the same place on both sides, just forward of the windows and about halfway down. It looks like the liner is literally one piece with the hull right here. In all the other places there's a gap between hull and liner. Right here it's all one. Not ultimately a big deal, epoxy being what it is, but still not optimal.
Knowing this (or if I'd been smart enough to foresee it), I should have used the 1/4" plywood stringers epoxied on, like I'd originally planned.
Mounted the stringers for the lower slats.
I had intended on making them of plywood, but I went to TAP plastics to browse and found some 1/4" thick white Starboard. It's similar to cutting board plastic material, but UV resistant (not that that matters down below). I cut it into strips about 7/8" wide (arbitrarily, based on the total width of the pieces I got). Then I drilled countersunk holes in the top, bottom, and center of each.
I decided on five stringers per side, about 20" centers. Not based on anything other than the amount of material I had. They are screwed to the liner with 8-32 machine screws going into tapped holes. Will the tapped holes be strong enough? Dunno. The very first hole, which I drilled and tapped as a test, pulled out. Don't know if that's because it got the most use, or if the material just isn't strong enough for threads to hold. I'll drill it out to 10-24 and see if they hold.
**************** See above *********************
Plan B, of course, will be replacing them with plywood that is also epoxied in. It really wouldn't be much more work, but I like the idea of mechanically fastened things because they're easier to replace later.
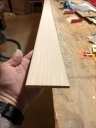
Anyhow, I also made some of the slats that will go on down there. I wanted much bigger pieces and a lighter color than on the top, so I went with doug fir. I also wanted cheap. I went with kiln-dried doug fir 2 x 4s. I selected the clearest ones I could easily find. Each was cut down to about 3" or so because my table saw won't cut a full width 2 x 4.
Then the 2 x 3 (actually 1.5 x 3, of course) is ripped to about 2.5 mm (don't ask why I switched to metric here, it was just convenient). Next, that piece is run through the thickness planer to get it to about 2 mm. Finally, it goes on the router to ease the edges and give it an oval cross section.
Cutting the half inch off had an extra bonus of allowing me to select boards with defects on one edge, since that edge was getting cut off. Also, they're eight foot long boards and the longest run (the very top board) is only a bit over seven feet. The lower boards, which will terminate at angles into the berth, will be even shorter.
My plan is to start at the top and gap them maybe 1/8". The height at the bow is a bit over two feet and at the stern end of the berth it's maybe 16". I should be able to use reasonably clear pieces (some are really gorgeous, considering they came from the framing section of Home Depot) at the top and trim away the biggest knot holes as the pieces get shorter down lower.
They'll be screwed to the stringers with #8 oval heads and finish washers. Depending on how the stringers do, I might use slightly longer screws that go into the liner, too. Not sure. When all is said and done, of course, each plank will be secured by only five screws, so removing the entire shooting match to make changes will only be a matter of taking out less that thirty screws.
I'm also going back and forth on finishes. I had thought of varnishing them to get that glow, since they start out so light. If I do, it'll have to be out of the boat, though. It's stuffy enough in there to begin with, let alone with the winter tarp over it.
Interestingly, by far the most labor intensive part of the project has been cutting the planks. Not just the finishing part (sanding, planing, etc) but the actual cutting. Ripping the nearly full width doug fir, even kiln dried, was causing the saw to cut out every 2 x 4 or so. A lot of friction for it. My wife was talking to our six-year-old about how sometimes we make things instead of buying them. I later told the six-year-old that if I could have bought these pieces precut to this size, I would gladly have done so. Each of these planks come out to about a buck in materials, but a surprising amount of time. It's funny how when I was young I had so much time and so little money, where now that I'm older it's exactly the opposite.
01/17/18
I installed the starboard side pieces. I started by estimating the angle the front ends needed to be cut to, then cutting those. I left them long in the front and back, knowing that I'll be taking them back out to finish them. I can draw a line after they're all in and then trim them to that to get them to end up even on the ends.
The top four are full length and installed easily. I used #8 x 5/8 oval heads in finish washers. One advantage of the finish washers are that you can redrill a hole nearby and the washer will still cover it. A couple times I managed to drill right into the existing screw head in the plastic, so I had to do that. I spaced the stringers out and used one screw per in order to get fewer screw heads in, just for the look.
As I got lower down I had to decide how to have the shorter pieces terminate. They don't really need to be especially fancy there, since it'll be covered by the berth cushions. I went with simple, mostly ending at stringers. There's one that extends out into a space. I'll stick a piece of the stringer stock behind it to keep it from bending in.
Next step is to take the pieces back out and get a couple of coats of varnish on them. Meanwhile I'll be ripping the stock for the port side. As I thought, compared to the top these pieces are extremely easy.
01/26/18
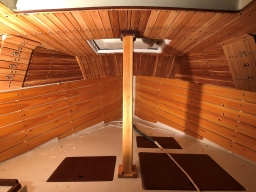
I fitted, cut and varnished the port side. All pieces have been installed and the project is essentially done. The bottom was indeed quite a bit easier than the top, in large part because there were so many few pieces.
I got the interior nice and warm with a space heater and finished the ceiling pieces with a water based polychrilic finish. Very easy and I'd already tested it on some WRC stock.
The chainplate covers don't match (vertical on the starboard, horizontal on the port), but I'm still not sure which one I like. I might never, in which case they'll never match.
All in all I'm pretty happy with it. The amount of wood and fasteners is slightly mind bending, visually, but I love the warmth of wood.
When I have the chance I'll clean all of this up. In the meantime, if you have questions about it feel free to post over at Trailersailor.com, where there's a thread (titled "MSOGPHOTOSITE Problem").