Curing water in the keel Total Page Hits: 2906
Post Type: Technical/Project
Boat Part: Keel/Centerboard
Date Modified: 12/09/2017 7:33 PM
12/07/17
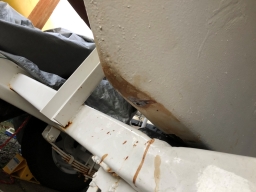
So I was going out to the boat a few weeks ago and discovered the dreaded rusty water dripping out of the keel. It's coming out at the very leading edge, slowly but surely. I figured there were two possibilities. One was that the water went up from below, gathering in the keel and then dripping out after she was hauled out for the season. The other was that it was coming in from above, leaking past something and gathering to fall in from above.
A week of unseasonable heat cleared it up, as the drip stopped completely. Later a deluge of rain started the drip again in earnest. So obviously coming in from above.
Searching around the inside of the boat, I found moisture in small quantities all around. I've already epoxied and sealed up all the cabin top hardware and nothing on the foredeck shows any signs of leaking. I think some of the cockpit coaming stuff (cleats) are leaking a tiny amount, but not enough to account for such a big leak.
The toerail seams a more likely culprit.
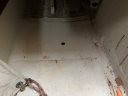
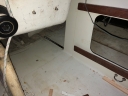
I got the boat totally opened up and couldn't find any likely avenue for so much water to get to the keel. Finally, at the suggestion of Henry, I took a 1" forstner bit and started drilling holes in the floor of the cabin (photos below).
I drilled three holes: one on either side of the centerboard, about six or eight inches back underneath the cockpit, and a third right in the middle, close to the berth bulkhead.
Under that third one I found very little space before the hull itself, and some moisture. Under the other two I found more of a gap (maybe 3/8") and standing water. That part of the mystery is solved. How's it getting there, though?
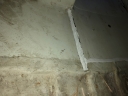
The inside of the cabin is a liner set into the hull. By looking inside the berths, the galley, and back under the cockpit, you can see where that liner meets the hull and is sealed off. In my galley model, there's one place that's not true: there's a section just aft of the galley where the liner extends all the way up to the toerail. If there's a bad leak there, I think it is able to fall directly down to the keel.
The first step is drying everything out, obviously. I set up a shop vac to blow (hose plugged in the exhaust port) into one of the holes. Lots of air coming out the other two. It's closed up in the boat with a space heater (it's pretty cold here right now). The water in the keel will just have to work its way out with gravity. The hole in the bottom will be epoxied, but not until warm weather helps ensure that the water gets out of the keel.
As far as the top, I'm not interested in cutting the entire floor out and laying a coat of epoxy on the top of the keel. Instead, I'll work on sealing that under liner area away from penetrating water. Like I wrote above, most of the perimeter is accessible from inside the cabin. I'll go crazy with either epoxy or 3M 5200 and seal all that up again.
Regarding the hidden section, I'm still not sure. It's only about a foot long, so I'm considering cutting through the liner right there with a Dremel, then laying thickened epoxy in there to seal it off, with some 3M 4000 layed across that. Then a patch over the top again. It's almost completely hidden from inside the cabin, being tucked up behind the cockpit and galley.
12/08/17
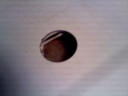
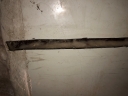
I found at least one point of entry into the void under the liner. Looking inside the quarterberth locker, I was tracing along the joint between hull and liner. I found a long section where the sealant put on during construction was interrupted for some reason. I took a thin brass rod and found that it passed directly into the void between liner and hull, where all the water has accumulated. So there's at least one down.
Next I went after sealing off the area behind the galley.
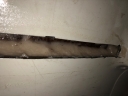
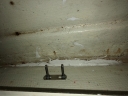
I took a Dremel with a cutting wheel and cut into the liner just immediately aft of the galley. I made an opening running the length of the liner area, about 3/4" wide, exposing the hull. I tried to position it at the high area of a lapstrake (judging from the exposed hull just aft of the area).
After softening the edges of the hole, I shoved a piece of 1/4" balsa the whole length of the opening, on the keel side (downward). The balsa gives enough to be squeezed in there nice and tight. Then I mixed up a whole bunch of epoxy with an adhesive thickener. I wanted it to be strong enough to compensate for any loss of strength in the liner there.
I smoothed out that epoxy as much as I could and tried to get it all the way around to totally seal out water falling from above. It'll be left open on the top to give the water somewhere to go.
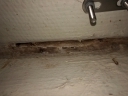
Next step will be using 3M 5200 all the way around the entire perimeter, including in the channel I just cut. The weather forecast gives me another week to perfect it, then Oregon weather will test it plenty. My ultimate plan is to put down some vinyl flooring, so I'll have to figure out how to cap the three holes I cut. I want at least some access down there to make sure it keeps dry...
12/09/17
Wow, I usually have a hard time using an entire tube of 5200 or 4000. Not this time. I went through the entire tube without getting the entire perimeter done, but I did get all the most obvious places. There were some spots inside the galley that also looked like they might have been holes. Or maybe not; hard to tell from such difficult angles (head inside a hatch).
Anyhow, what a messy job, but it's mostly done. I will probably apply some more 4000 once I open a tube for another job (sealing up the last of the deck hardware). Won't really know much until it rains good and hard.
Once I'm confident in my sealing job, I'll start figuring out how to seal up the holes I drilled while also keeping access to dry it out. Epoxying the bottom of the keel will wait until the summer, when I can be more confident all the water that was trapped in there has worked its way out.