Getting Started Total Page Hits: 1344
Post Type: Technical/Project
Boat Part: Not Specified
Date Modified: 02/11/2018 2:27 PM
Shared June 5, 2009 by Howard Audsley:
In doing any repair, it helps to know what you are fixing. In the case of the M-boats, how they are put together.
Other than hardware, the boat is put together in three parts:
The hull, which includes the stub keel, is the bottom half of the boat, including all the lapstrake areas, transom, etc. Not many holes in this, except for the keel boats and any holes punch through for drains, CB bolts and some transom hardware, such as chainplates for backstays, rudder gudgeons, etc.
The cabin liner, which includes the quarter berths, forward cabin, and in the case the older boats like Audasea, the galley. This is basically fitted to and glued to the inside of the hull. A one piece layup of fiberglass, just like the deck and hull. In construction, saves a bunch of time fitting bulkheads, bunks, etc and assures an exact fit and replica every time.
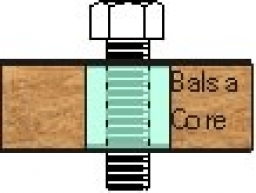
The deck, which is the top half of the boat, including the cockpit, coamings, hatch, side decks, fore decks, etc. On the older boats, the metal toe rails were set over a flange joint and through bolted at about 6 inch intervals. In stress areas, every 3 inches. The deck would be laid up in the molds upside down. After enough glass is laid up, some areas of the cabin and and area under the cockpit sole got a core of 1/2″ balsa wood, then additional glass was laid up over that. A core over fiberglass acts like an I beam and offers significant strength for the weight.
Fiberglass isn’t going to leak through the glass itself. Water only gets past it at the margins, meaning any edges or holes. When leaks occur, holes are normally the culprits.
Most of the leaks I’ve had to fix are in the cabin top, including a running battle with leaks at the hull / deck joint. If you start counting, there may be as many as 40 to 50 holes punch through the cabin deck for mounting hardware. Ten or twelve in just the handrails alone, plus 6 each for side stay chainplates, etc. In short, a lot of places for leaks.
Other than being a nuisance, leaks don’t cause too many problems, UNLESS the hole was punched through and area of the balsa core. If that happens, it’s big trouble. Balsa is going to absorb the water like a sponge and once it gets in, it is trapped. The balsa starts to rot and that’s a problem. Loss of strength and gain in weight. You really don’t want your balsa core to get wet.
All hardware is caulked and bedded at the factory, but that only lasts so long. Eventually, all holes leak. The best way to avoid trouble is to drill the holes out and backfill them with thickened epoxy, which will soak into the balsa, sealing it, but also forms a waterproof bushing. Any leaks just drip into the cabin, bypassing the balsa core.
The best way to make this repair is to remove all the hardware (pull the bolts and pull off the hardware, i.e, turning block, cleat, hand rail, etc.). A good size to make the bushing is 1/2″ to 3/4 inch, depending on the size of the bolt. A 1/4″ bolt should have a 5/8″ to 3/4″ bushing poured. That means the hole has to be drilled out larger and it should be drilled out on the INSIDE. The outside hole isn’t touched. It will never look any bigger than it did at the factory.
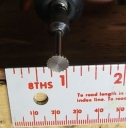
Next problem is, you really don’t want a big hole inside the cabin either. It’s harder to do the epoxy plug with a large hole and it looks bad. So how do you remove a 5/8″ plug of core without drilling large holes? I used a saw blade on the Dremmel tool:
Dremel Tool
It’s 3/8″ in diameter. Stick it through a 3/8″ hole you drill through the liner on the inside and you can gain an additional 1/8″ all around the hole, making it 5/8″ wide. You then tape over the 3/8″ hole (use blue painter’s tape or gray duct tape) on the inside and pump/pour thickened epoxy in through the outside until the hole fills up. If you have trouble hitting the hole, use a 3 ml syringe without the needle (I get mine at a farm and home store that sells these for vet use on livestock). Once the epoxy sets up, you drill out the hole to the size bolt you need and you are done. Not only is the hole now waterproof, but you have poured a 5/8″ epoxy bushing that can also handle compression loads. I guess it goes without saying, but I’ll say it anyway, all this talk of epoxy plugs, etc. only applies to areas with a balsa core.
When finished, your epoxy plug should look like this:
Proper Epoxy Plug
Last thing, when you re-bed your hardware, best product to use is Boat Life Caulk, a poly sulfide. Next best might be an easy to remove polyurethane like 3M 4200. Very few places you ever want to use 5200. It’s more adhesive than sealant. Use that and you will play hell ever getting the hardware off in the future. Lastly, when installing stuff, just set the screws down a bit to squeeze out the sealant and then stop and let it set up. Don’t tighten them all the way down until the stuff set’s up. That way, you compress it a bit. If you tighten it all the way first, you squeeze out all the sealant and don’t get a good seal.