M17 Hull Deck Joint Total Page Hits: 1323
Post Type: Technical/Project
Boat Part: Deck
Date Modified: 02/11/2018 2:29 PM
Shared June 5, 2009 by Howard Audsley.
One of the chronic leaks that caused me a lot of grief was in the hull deck joint. Part of this is due to the nature of the leak itself. Chronic. It really only leaked during or after an extended period of wet weather. Previous owners must have suffered from the same problem as someone before me had attempted to get it stopped by putting a bead of silicone caulk on the hull deck joint….inside the cabin. Leaked right past that.
But time and time again I’d leave the boat tied to the dock in good shape, only to come back in a week or two to find the cabin bunk cushions wet and water standing on the bunks. Sometimes at night it would rain drips would run down the side. I’d get wet. Cushions would get wet. It smelled wet. Time to get it fixed. After some deliberation, I decided the deck had to come off!! No other way to do it.
So how big of a job was this going to be? First way to find out was to pull the toe rails off. Once I did that, I was relieved to find the source of my leak. The fix wasn’t going to be nearly as drastic as I thought.
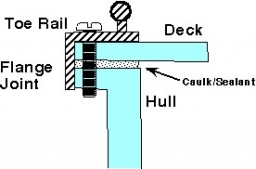
The older boats with metal toe rails have a hull/deck joint that looks like this:
Hull Deck Joint
During construction, the flange of the hull would have been coated with a sealant (probably 3M 5200 or something equal to it for this use), the deck set on top of that, the toe rail set in place and through bolted at 6 inch intervals. The high stress areas (toe rails on the older boats are used for jib leads) were doubled to every 3 inches. Just bolts. From memory, they might have been 3/4 inch #10 – 32 Stainless pan head screws with square nuts. No washers. Once you pull the screws, the toe rails popped right off.
What I found were a couple areas where the bedding material at the flange joint was shot. Loose and flaked right out. I poked around a bit and got more out. The “fix” was to grind out as much of this bedding as I could (I used a thin grinding wheel attachment on the Dremmel tool) to really open up this joint. Since I wanted it sealed and really didn’t want it to come off, I worked in thickened epoxy. For this, I used a syringe with a needle poked in the joint and squirted the goo in until it oozed out. Then worked the entire joint with more stuff. Once it set up, it was all sanded back smooth and recoated with plain epoxy to seal it.
While all that was going on, I took a look at those aluminum toe rails. They were beat up a little, but still solid. After wire brushing them as clean as I could get em, they were primed and painted with good ol Rustoleum….semi-gloss black. Three coats. They looked like new.
These had been caulked under the toe rail in addition to the joint, so I did the same putting them back. A small bead of 3M 4200 (it’s what I had) under the rail and over the side of the flange joint…..and proceeded to bolt them back on. Once finished, no more leaks. None (going on 5 years). What I had feared was going to be a brutal job turned out to be not so bad after all.
Other observations: the stem cap where the forestay pins to is held in place by maybe 6 or 8 screws, plus whatever bedding adhesive is used. A good place for 5200 if you never want to take it off. You shouldn’t have to very often. But that is all that’s holding it on. A lot of stress on the flange and 6 to 8 bolts and nuts.
Thoughts on the toe rails themselves. Of the two options (the newer models have a box top flange, also bolted, and a teak toe rail)…..my preference is the metal toe rail. Can’t say no maintenance after having just described how I painted it, but that’s all I’ve ever had to do. It also gives me attachment points for a lot of things, including jib leads, boom preventers, tarp tie downs, etc.
BTW, on the topic of preventers, I used two types. The quick and dirty type is a little dangerous. It’s a black rubber tarp tie down. Metal hooks on the end could be lethal if they let go and snapped back at me. I only use them in light air to hold the boom down to keep the main from flogging in boat chop. The real preventer is my boom vang, which has snatch blocks on the ends. I can take the bottom half of the vang to the toe rail, and it’s not going to budge.