M17 Cast Iron Centerboard Total Page Hits: 1800
Post Type: Technical/Project
Boat Part: Keel/Centerboard
Date Modified: 02/11/2018 3:31 PM
Shared June 5, 2009 by Howard Audsley.
The CB on the M17 comes in two types that I’m aware of. The original cast iron boards and newer have fiberglass boards. Since mine is the cast iron type, I’ll limit comments here to what I know about these. To start with, it helps to understand what they are and how the are built. For that, some information already exists on the msog.org site:
http://www.msog.org/models/m17/m-17-cb.cfm
As near as I can tell, the stub keel was layed up as an integral part of the hull. After that, the CB slot is cut and the trunk sides are set in place. I’ve never heard what it is they were set in place with, but my guess is something like 3M 5200. If not, it was probably a polyester type gel. They used to sell one (and may still) that was about the consistency of Vasoline jelly. At any rate, whatever was used, after the trunk sides are in place, the ballast, consisting of steel or iron punchings (they are about the size of camera batteries, deer droppings, etc) was also encased in some type of resin. If memory serves, there is about 500# of this stuff in the keel of an M17. On some boats, the ballast was simply covered and a bilge/sump was left. On others (like mine) the ballast cover was brought up flush to the cabin sole (no bilge). Some might have been finished flush with an empty cavity below. Those have the potential for trouble if water gets in them. More on that later.
The CB itself is a pie wedge style, which hangs from the keel on a pivot pin and drops down from the slot. At the aft end of the board is a tooth that is cast into the board. That tooth drops down onto a stopper pin, that carries the weight of the board (about 180#’s). The original stopper pin is not much more than a 1/4″ flat head screw. A very large screw with a flat heat that sits flush with the keel. Low drag. It’s also not big enough to take any sort of pounding if you let the CB drop down hard. Even feathering it down, mine has a solid THUNK when it bottoms out. Aside from the stopper pin, the tooth isn’t all that robust either, despite being a part of the original casting. If you pull the board, look that tooth over carefully. That’s what your board rides on.
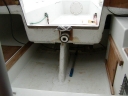
The pennant (pronounced pendant) that raises and lowers it hooks to the aft end of the CB. The CB is 3/4 inch wide and for the pennant clevis, there was a “step” cast into the board, so that the clevis is no wider than the board, and will ride up and down in the slot. The pennant attaches with a simple knot (mine uses a figure eight) although I suspect some have also been rigged with spliced eyes and a thimble. The lift mechanism is a winch, located inside or just outside the companion way step. Mine is inside. Two wraps and some grunting with the winch handle and you can raise it. It’s a load. Maintain two wraps and hang on while you feather it down. THUNK!!!
Lift Winch and Centerboard Trunk in Cabin
When I had my board out, I laid it on a large piece of paper and traced the outline of it, so I have specs if anyone needs them. I could try to copy them, or draw them on a graphic file and post them.
As for repairs and maintenance, there are two parts: the trunk and the board.
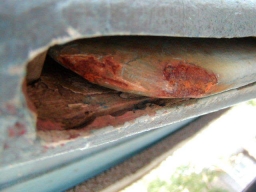
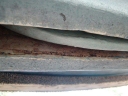
The Trunk: Not much really to maintain, but potentially the source of a huge problem on the boat. On older boats, it’s possible that whatever was used to seal/bed the CB trunk sides to the hull at the base of the CB slot has dried, cracked given way.
As can be seen, whatever was used to seal the trunk sides is no more. Cracked, and in some cases, simple gone. Water…..sea water…..can now seep up into the ballast area. It all depends on how well the ballast was encased in whatever they encased it in. Or it could even seep past that and start filling up the cavity above the ballast if one was left. If you have water seeping up into the cabin from the CB trunk, this may be why.
Second part, and potentially the BIG one, is if water gets to the ballast and it starts rusting.
Rusting ballast will expand may push the trunk sides out. If your CB binds and won’t go up and down, this is a possible reason.
Assuming no damage to the ballast, the cure for the cracks is to pull the board, then grind out the gunk, back fill with thickened epoxy and run a piece of glass tape over the joint. Fair it, sand it and paint it. That can be done relatively easy. A swollen trunk and bound up board is another matter. A lot of guys have pounded them out (inserted steel rods inside the pennant hole in the cabin and tapped on them from above with a hammer) and also by working hacksaw blades down each side. All I can suggest here is to be careful. That board weighs 180 pounds and when it lets go, it may drop in a hurry. I would not be underneath it for anything.
If the ballast has rusted and trunk swollen, you’ve got problems. The cure for this is to open the side of the trunk, jack hammer out all the old ballast…..fix the trunk sides, then replace with lead ballast and put the sides back on. Before you do this, test the ballast with a magnet to make sure it’s steel.
I had this trunk repaired, but I didn’t do it myself. I took her to Hoopers at Afton, MN. They know the boat and know this repair. I feared I was going to need the ballast job, but it turns out she was not bad at all. They only had to do the repair of the missing sealant at the base of the trunk sides. Excellent work and reasonable in price! Worst case scenerio, it’s probably a $1,000 to $1,500 repair, plus whatever it costs to get it there and back.
On the board, I have pulled the board myself. Lots of ideas on this, with all kinds of schemes and methods to lift the boat from the trailer enough to let it drop. For $90, a local yard helped me with their host, and put lift straps under the boat, lifted it off, we pulled the trailer out and set her on her keel. We then pulled the pivot pin and raised the boat again….and the CB was left behind to drop out the bottom. We moved the CB out and dropped the boat back on the trailer. Safely.
Once out, I found the board to be in rough shape. If had been fixed before, but the repair had not held up. Some kind of fairing compound had been used, but it was rusting all over. After a little checking around, the solution we found was to have it sand blasted. A auto body shop did it for me for $50. A good idea, but only if you have planned ahead.
Remember, these are cast iron and will rust if exposed to water. Just look at the tip above for how bad this can be. I knew I wanted to paint it with an anti fouling bottom paint and with these systems, you work backwards to through your prep steps so you can finish where you want to. In my case, I got the bright idea I wanted to use Interlux VC offshore, a vinyl paint. Prep for that was way to complicated, involving an etching primer, an sealing primer and eventually the bottom paint. Three different steps and all complicated and of course, all needing different thinning agents, etc that nobody had locally. And hazardous to ship which meant money.
In retrospect, I’m reasonably certain the same thing could have been accomplished by simply using thickened epoxy. Blast the board, level it and within minutes, try to roll on a coat of unthinned epoxy. Get on it as soon as possible and the board will start rusting within minutes. If you are blasting it yourself, do the sides one at a time. Use a coat of thin, then another of thickened epoxy. One pouring should do it If you leveled the board, a sagging epoxy will self level and self fair. Thickened with cabosil will harden the cured epoxy to help resist dings and scratches. Fairing is also going to be needed if my board is any indication of the rest of them. It had a lot of voids cast into it. Level it, use thickened epoxy and it should work like a charm.
If you let a shop blast it, roll on your first coat of fast cure at the blast site. As soon as it can be handled, flip it over and do the other side. If level, the epoxy will self fair. Some folks suggest you hit the original coat of wet epoxy with a wire brush to work it into the cracks and to bust bubbles. Can’t hurt. If you can work there, go ahead and lay on the thickened stuff to self level and fair it. Or take it home and do it there. You have a day or so where a chemical bond is still possible. Standard wet on wet/wet on dry rules for working with epoxy layers apply.
One you are sure you have the board completely coated and sealed with epoxy, and no iron is exposed, you could wash, then slight sand it (or wet sand it….about 100 grit) and go ahead and apply anti fouling paint. Much easier than what I did!
As seen on the previous photo, the tip of the board takes most of the abuse. Keep an eye on it and touch up as needed. Boards retracted up into the trunk get very little fouling, as there isn’t much light inside the trunk.
Questions?