Replacing old M17 windows Total Page Hits: 1663
Post Type: Technical/Project
Boat Part: Portlights
Date Modified: 02/11/2018 3:34 PM
Shared June 5, 2009 by Howard Audsley.
By now, it must seem like it’s a miracle the boat ever floated what with all the leaks and all. Well, they were not that bad, but leaks are leaks and what that means is when it rains, stuff gets wet. Chronic, but leaks just the same and a nuisance.
The side windows were no exception. The originals were two part aluminum frames. An outside part with an exterior flange and inner channel which held the glass, and an inner frame which screwed to the exterior frame from the inside. The frames themselves were corroded a bit, but in general, where in decent shape. The glass was crazed and hazy, but probably had a few more years left. What was leaking, it turns out, was the rubber gasket the glass was set in. Over the years, it had become hard and brittle and water would just wick right past it. The easy fix would be to run a bead of silicone caulk around the glass and frame edge. Temporary and ugly to boot, so that was ruled out. No, what needed replacement was that channel gasket. But after numerous searches, inquiries to glass shops, etc, I had no luck in finding a replacement gasket to fit that channel. Beyond that, to get it replaced meant the outer frame was going to have to be opened up, the glass replaced and the frame riveted and soldered back in place. Possible, but was there a better way? A note from Bob Eeg, builder of the Montgomery’s suggested there was.
Probably about the same time as the deck was retooled to include the box top flange, the windows were also changed to include a detent ring for the windows. Instead of the aluminum frames, the windows were fitted into a recess and simply through bolted to the cabin top. Glass was replaced with plexiglass or lexan. Bob had done a refit on an older M17 he had traded for, and had replaced with side windows by bolting a similar piece of plastic to the cabin side. They were not flush mounted as the new ones were, but looked ok. I decided to do the same thing.
After looking the original aluminum frames over, I decided they were not the look I was going for. A bit too large. So instead, I used a piece of 1/4 plywood to first trace the opening in the cabin top. Once that was traced, and cut out (to make an ply piece the exact same size as the opening), that was placed on another piece of plywood, and traced out. Looking that over, I figured a 1 inch margin of ply around the hole would be enough room to bolt through. The problem was that once that was traced out, it didn’t look right. After a bunch of trial and error sketches, what I would up with was to let extensions of the 1 inch margin lines intersect each other, then I created rounded corners of different sizes. It came out with a sleek, “European” look, which I decided was OK.
Port Template
I then cut that out as a pattern and took it to a local glass shop and had them cut me out a pair of side lights of the same shape, out of gray smoked 1/4 inch Lexan. You could hit that with a hammer and it won’t break, but of the two, Lexan is prone to scratching. But if it goes bad, it’s no big deal to replace. The windows came from the glass cutter with a sharp edge, which I hit with a 1/4″ round over router bit.
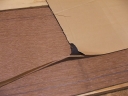
Next was what to seal it with? A buddy of mine works for a company that makes a black sealant tape. Reminds me of the old style taffy we used to buy as kids, that came between two sheets of waxed paper:
Template for Sealing Material
Seemed like really good stuff, and he swore by it, but I wasn’t too sure. So I did one with this stuff and one with black silicone caulk. Normally, I would use Boatlife caulk (polysulfide), but everything I’ve read said it would eat the Lexan. So one went on with the black tape, and one with silicone. I used 10-32 angle head machine screws, stainless cup washers. For the inside, I decided I wanted something a little nicer than the simple acorn lock nuts and washers, so I used the same two ply patterns…the outside for the whole shape and the inside for the window cutout, to make a piece of 1/4 inch plywood trim for the inside, which I varnished. This also did a good job of hiding the edge of the window hole cutout in the cabin side.
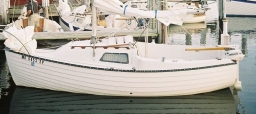
This is the boat with the replacement windows in place.
Boat with Replacement Ports
After about 4 years, I’ve noticed the black caulking tape has dried and cracked, and that window is now leaking again. The silicone caulked one is fine. Overall, this was not a big job and in my opinion, a great way to replace the side windows on the older boats. My normal preference is to stick with the original equipment, but in this case, I think it was a good upgrade.