M17 Chainplates Total Page Hits: 1563
Post Type: Technical/Project
Boat Part: Standing Rigging
Date Modified: 02/11/2018 3:42 PM
Shared June 5, 2009 by Howard Audsley.
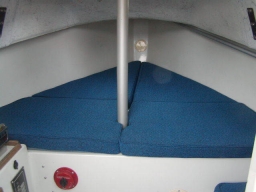
One of the chronic leaks that caught my eye was through the bolts at the chain plates. You can almost see them in the above photo, peaking out the corners. If you were in the boat during a wet evening or rain storm, you would eventually find water weeping past those plates and running down the inside of the cabin. Those wet cushions again.
But then I got to thinking, thats not good. That’s a cored area.
Now that I was paying attention, all of a sudden I realized that somebody had put a layer of heavy woven glass roving over those, and either painted or gel coated them to hide the repair. Since the boat was torn up anyway, I decided to take a peak. I pulled off the nuts, pushed out the bolts, removed the plates on the inside and started poking around. What I found was not good. It was black mushy stuff. Taps on the cored area met with a dull splat vs. that sharp pinging sound you want to hear. My core was rotten (my grandmother once suggested I was rotten to the core, but that’s a different story).
Knowing that it’s the chainplates that take all the stress of side stays (shrouds)….all the heeling force…..and a solid connection is what holds the mast up, a feeling of concern set in.
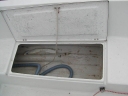
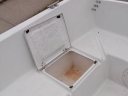
There are several cored areas on the M boats. Most of them are under the deck part of the boat: under the deck, cabin top, cockpit seats, cockpit sole, etc. You can see how it’s done in these two photos of the inside of the cockpit lockers (see pictures)
So what is the core? It’s half inch thick square blocks of end grain balsa wood (cut across the gain to half inch thickness). End grain balsa is used for compression strength. Seems to me like they are about one inch square. Again, the purpose is to give strength to a relatively thin layer of fiberglass, which by itself is relatively weak and flexible. You can give it strength by curving it (hull lapstrakes offer exceptional strength), by making it thick or by adding something to it like a stringer or core. The latter two act as I beams to prevent flexing. In the second photo above, looking inside the cockpit locker, on the lap strake just above that grey flexible hose is a round looking tube. That’s a stringer that’s been molded into the hull. there are others like those in the bow area under the bunks.
Balsa core on the deck offers exceptional strength for the weight it adds (good…..being that it is up high where you don’t want it messing with the center of gravity), and also insulates. The interior area backing the chain plates is cored for strength, through bolted to an interior backing plate for good measure. Rotted out core offers nothing but trouble.
Ok, so this fix is not for the faint of heart. Removing core of any kind means opening up the boat. In this case, cutting off the inside fiberglass laid over the core. The core then has to be removed and replaced, and glassed back over.
How to cut it off? First thing is to completely empty out the boat. Everything goes because grinding is going to set fiberglass dust flying. Can’t be helped. I tried to git er done using that Dremmel tool again, using a cutting wheel…..no joy. Then something like a rotozip….bits snapped like twigs. My light duty tools were all over matched. Wound up using a small angle head grinder with cutting wheel. For safety equipment, you need a good quality respirator (not the white mask types…..a real filtered respirator….unless you want to breath in glass dust). Also eye goggles and ear muffs. Ear protection is twofold. For hearing, and again, to keep that glass dust out of the ear canals. It is going everywhere (When the grinding was all done, I vacuumed her out, then power washed the entire insides, top to bottom….to get rid of all the glass dust).
Once those were cut out, the remnants of the core fell out. Black, wet mush. If you have rotten core, don’t even think about those creative fixes, such as penetrating epoxies you pump in to shore up the rot. Get rid of it. If you saw what I saw, you would agree with me.
Once the rot was gone….the entire core area…..I also had to clean up the remnant hard resin that formed between the core blocks during construction. Sanded it back to to smooth.
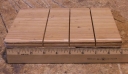
So what to go back with? Balsa core was what they used in the first place, but I didn’t have any. What I did have was marine plywood….1/4 inch fir. Two layers of that would equal the 1/2 inch thickness it started with.
Next problem is, the cabin area where the plates are is not flat. Well maybe a little at the bottom, but it starts curving above the plates and really curves at the turn of the cabin trunk sides running up onto the coach roof (cabin top). Whatever you go back with has to take a curve. The original 1/2 inch balsa core is glued to a scrim (cloth) that conforms to curves. I could do that, but didn’t have anyway to hold them in place (original construction would have been laid up upside down with gravity working with them). For the lower sections, I managed to get a piece of my glued up half inch ply to fit, ruling out gluing it in place in favor or scoring it so it would flex.
(see picture 'My Substitute Core Material')
Using a radial arm saw, I scored the ply by making horizontal cuts through all but the last layer of ply. The more the bend, the more and closer the cuts. To push these in place and hold em until the epoxy setup, I used a small bottle jack braced to the other side of the cabin, pushing a 2×6 board set on the ply core cross ways. Flexing closes the cuts, but once it’s glued in place, any remaining gaps in the cuts are backfilled with thickened epoxy to form a solid piece. Even this short piece with 3 cuts will bend about an inch. Still, at the top the radius of the turn was about 3 inches where the core blended in to the coach roof, which was too steep to get a one piece ply core to take a bend, so I cut and mitered in narrow fitted pieces, glued in one at a time (about 3/4 inch high and the same width as the lower core). It finished up totally solid. I then formed a smoothing fillet along the side for the glass cloth to drape over and after filling all the cuts, covered the ply with several layers of glass cloth, to a glass thickness of about 3/16th inch. The edges were faired into the coach roof, then sanded out, and smoothed over. Once cured, painted over it with gelcoat to match the rest of the interior.
Before putting the chain plates back on, I drilled out the bolt holes oversized, then backfilled with thickened epoxy, then redrilled out the bolt holes. Again, any future leaks (I assume all holes eventually will leak), go past the core into the cabin. The epoxy bushings also take up a lot of the stress of shear and compression loads (substantial…. remember this is holding up the mast ).
End game is it’s as solid if not more so than when new and no more leaks.
Addendum:
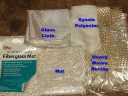
On doing glass work like this, you are attempting to duplicate the original glass work in terms of thickness, type, etc. Glass boats are built from layers of fiberglass cloth and mat. Examples can be seen in the 'Fiberglass and Xynole Cloth, Mat and Roving' photo:
Glass cloth is woven strands of fiberglass. Mat is simply fiberglass strands layed up in a random pattern. Glass cloth adds strength and resistance to flexing. Mat doesn’t have much strength and is used for bulk. Normally, they are put down in alternating layers. The problem with Mat and epoxy is that for some types, there is a binding fiber that is used to hold the mat strands in place until it’s layed up, and the binder is “melted/destroyed” by polyester resin. Epoxy doesn’t “melt” the binder, so you don’t get it to drape and you may get voids. The word is you don’t use epoxy with mat (despite what it says on the package). An alternative is to use xynole polyester cloth, which also offers substantial bulk, but not much in terms of strength. Woven roving is also a woven glass, but a very heavy version of it. It adds bulk and strength. OK for a flat layup, but it doesn’t flex much so it’s not much help in areas with sharp bends and curves. Epoxy and roving work OK, but wetout takes some effort. Wetout is critical, or you wind up with a void in your layup.
A layup of this thickness takes about 7 to 10 layers of something. This is thick enough to get some heat buildup and a premature kick to the epoxy if you try to put it all on at once. Use slow cure hardener and take your time. The first layers are the biggest in size…..overlapping the cored area by 2 or 3 inches…top, bottom and both sides….. and they get progressively smaller as you add more layers, so that the margins feather in to the margins of the core. Otherwise, you get a noticeable bump where the glass cloth over core ends. A little cabosil in the epoxy to thicken it a bit (but not so much as it won’t wet out), helps it hang in place vertically and upside down until it kicks.