Cast Iron CB Repair Total Page Hits: 1690
Post Type: Technical/Project
Boat Part: Keel/Centerboard
Date Modified: 05/30/2016 11:49 AM
I purchased the boat with the understanding that a keel job might be necessary for this vintage boat. I did not however expect the keel to be frozen (fixed) in place. The first sail revealed that was the case. I purchased a 4 foot length of .25" diameter rod and used that the next time on the water to help influence the board down. However, I was only able to move the board about 2 inches down at the aft of the trunk with what I thought was the maximum I could beat on the shaft without doing any further damage to the board or trunk slot.
My first plan was to get the keel down enough to sand or scrape off what ever was keeping the keel stuck in the trunk. Unfortunately, with this added effort, I was only able to get the keel down about 4 inches before it got seriously stuck. The gravity of the situation (or lack there of in this case) seemed to indicated that I would need to do it right and pull the keel out for a complete retrofit.
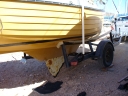
My plan was somewhat copied from others on the PhotoSite that chose to move their boat back on the trailer to the point where the keel was free of the trailer roller and could be removed from the trunk. Since my boat is kept in a mast-up dry storage at the lake, I chose to float the boat back on the trailer and secure the bow to the trailer. To minimize the weight on the transom, I removed the outboard motor, rudder, and lowered the mast. I then carefully towed the trailer up to my storage spot.
One advantage of my spot in the yard is that the rear of the space has a drainage ditch. By building a small ramp out over the ditch, I was able to get enough height above ground to lower the keel completely out. I did have to dig a slight trench to provide an additional 2 inches of clearance, but that was easy in the desert gravel.
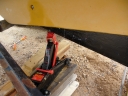
Removing the keel was quite a chore. I alternately worked from above by pounding on the keel with the shaft and clamping on the board below with vice grips and pounding on them. Eventually, wiggling the board back and forth with a pry bar worked the best and eventually it worked free after about 2 hours of coaxing.
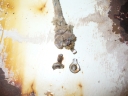
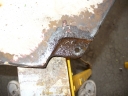
The stop pin on my boat was a 3/8 inch flat head screw 2 inches long. To break it free required an impact driver. The pin was bent severely, apparently the result of a keel drop test. The flathead end of the screw was exposed so I did not have to dig for it as some have had to do.
The pivot pin was a 3/8 inch hex head bolt about 6 inches long secured with a 3/8 inch nylok nut. This was in good condition and was fairly easy to undo and drive out with a drift pin. The bolt and nut were exposed, so again access was easy.
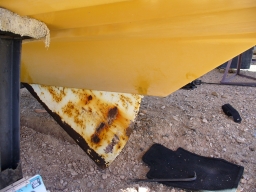
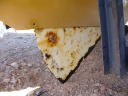
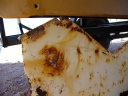
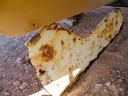
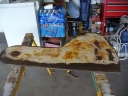
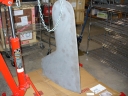
Once free, the keel did not have as much rust build up as I had expected. I took it home and attack it with the surface grinder and removed all of the loose stuff but did not make much of a dent on the deeper corrosion on the leading and trailing edge of the keel. I decided to have it sandblasted before recoating.
The centerboard pendant was another story. The rope pendant had a bowline tied around a screw shackle which was corroded in place. I had to cut it free with a hacksaw. In retrospect, the bowline was perhaps the culprit for the stuck centerboard as it was as wide as the centerboard slot.
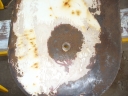
The centerboard had a brass bushing in the pivot hole. I do not know if this was original equipment, but it looked good and was a tight fit around the pivot bolt.
Sandblasting charges were $65 and completed overnight. I placed the keel on an engine hoist and painted it with two coats Interlux 2000 before a final two coats of black enamel.
It had been suggested to remove the center core of the rope pendant before tying the bowline knot to the centerboard shackle (to reduce the thickness of the knot). I decided I wanted to make the strongest connection possible, so I chose to make an eye splice out of the two part 5/16 inch braid. Not having done this for a while, I had to drag out the Marlinespike Sailor to review eye splicing again. After the second try, I made a fair looking eye splice. Marrying this with a shackle with some flare where the eye was formed made a connection with which I was comfortable.
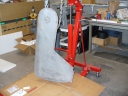
Reinstalling the keel was just about the reverse of the removal. I built a double A-frame from plywood and 2 X 4 to support the keel vertically (and keep it from falling on me). I attached the centerboard pendant and fed it through the keel trunk and to the keel winch. By pulling in on the centerboard pendant and jacking the front of the keel with a floor jack, I was able to position the centerboard back in the trunk. After maneuvering the centerboard back and forth with a screwdriver, I was able to get the pivot pin back into the hole and secured in place. Although simple in description, it still took about 2 hours to get everything in place and horse the keel into position.
I was unable to find a stop pin (3/8 inch flathead screw X 2 inches long) after a short search of local suppliers and decided to straighten the existing pin in a vice and reinstall. For the time, I have chosen not to epoxy in the pivot pin access holes or stop pin.
After several sailing sessions, the board goes up and down freely and as I expected it would originally. In retrospect, I would have looked more closely at the pendant knot as the culprit. That would have been a pretty quick fix and given me another month of prime sailing weather. However, now I have the keel job behind me and it should be good for many seasons to come.
Steve Shenkel (Steve no longer owns this craft)