Remounting and Adding Mast and Boom Hardware Total Page Hits: 2816
Post Type: Technical/Project
Boat Part: Mast
Date Modified: 11/26/2016 6:35 PM
M17 Mast and boom rigging hardware changes and improvements are shown on the attached photos and explained here. We have no metalwork expertise, and only simple homeowner tools. All the work here can be done by novices, with a little care and patience.
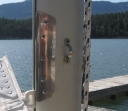
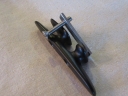
Mastgate - This is a must have addition to simplify raising, lowering and reefing the mainsail. Make your own as in photos, or buy a better one online.
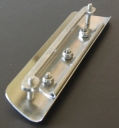
Notice the long ss nut plate which fits inside the mast slot. Loosen the two screws to remove sail slugs.
Remounting hardware on the mast and boom - We have never liked hardware mounted by tapping the thin aluminum mast and boom sections for stainless steel screws. We have had trouble on previous boats with such screw attachments loosening and corroding over time. Since this was our first new boat, we wanted to solve this problem from the start. All the original hardware on our boom and lower mast were mounted with machine screws, no rivets. Several original screws were loose before ever being used, and some tapped threads were partially stripped. The original flat base cleats rocked on the curved boom and mast surfaces. So we removed all cleats and hardware mounted with screws. We mounted cheek blocks, eye straps and pad eyes with stainless steel rivets. For remounting cleats, we drilled out the original screws holes that had been tapped into the mast and boom, and used internal stainless steel washers/nyloc nuts or homemade nut plates. Nyloc nuts were used for locations that we could reach inside the mast or boom with a small wrench. Nut plates were used where we couldn't reach inside; nut plates were homemade using 1/8” stainless plate. Tapping the stainless is a little difficult; you sometimes break a tap. Thicker aluminum nut plates can also be made and are easier to tap. We used a small stick, masking tape and trial and error, to position each nut plate inside the mast or boom, then screwed the hardware to it. We replaced flat base cleats with curved base cleats, or we fabricated aluminum shims to adapt flat bases to the curved mast. Before installing any fasteners we dabbed aluminum holes with zinc chromate and used tefgel. We applied vinyl tape to the contact side of the ss nut plates, to reduce stainless/aluminum contact corrosion.
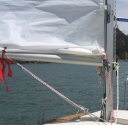
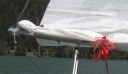
Reefing hardware - After seeking all the reefing advice we could find, we finally chose separate reefing lines for the luff and leach of the sail. We reef almost every sail as our lake winds vary from 5 to 30+ mph every day. Separate line reefing has worked well for us for both first and second reefs. We’ve thought about adding a reefing horn for our first luff reef, but we really like setting the main halyard with the reef tack grommet a little high, and then tightening the reef tack down with the reefing line.
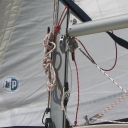
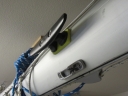
Boom sliding gooseneck and downhaul cleat - The sliding gooseneck may have advantages, but we didn’t like it, compared with our previous boats with fixed goosenecks. Our remedy was to add a nut plate to clamp the downhaul cleat in the mast slot. In the mast slot, above the downhaul cleat we installed a little wood stick long enough to support the sliding gooseneck where we wanted it. This works good to support the boom, allows adjustment, and can still allows us to hoist the boom a little off the stick, then tension with the downhaul cleat.
Boom vang - We used a typical bail for the boom attachment and drilled two holes in the mast tabernackle for a rope loop. We attach the lower vang block to the loup with a quick pin.
Mainsheet boom bail - Our original bail was attached too far aft on the boom causing the mainsheet to interfer with the tiller. We added a new bail further forward.