Installation of Transom Ladder on Montgomery 15 Sailboat Total Page Hits: 3524
Post Type: Technical/Project
Boat Part: Transom
Date Modified: 02/20/2017 11:08 PM
Details
A pdf of this post with the photos that go with it is also available at: http://davidgrah.net/Ladder.pdf
Installation of Transom Ladder on Montgomery 15 Sailboat By David Grah Winter 2012 / 2013
For the few years we have had our 1986 Montgomery 15, we have used a removable ladder for getting back on the boat when we swim. Although it worked, the removable ladder was not very secure nor convenient to deploy and stow.
I asked on the Montgomery sailboat discussion group for ladder suggestions and received some very good information. The group said to stay clear of ladders with only two mounting points because of the stress they would put on the transom and suggested a Garelick 18017 Marine Compact Two-Step Transom Ladder in particular as a good four point ladder. Dave Scobie also provided a link to his excellent page about installing transom backing plates for ladders and motor mounts on a Montgomery 15:
After looking into ladders a bit, I was concerned about how much the Garelick ladder might stick up above the top of the transom when stowed and liked the idea of a telescoping ladder. Since I live many hours drive from anywhere I could see ladders, I decided to buy both the Garelick and the telescoping ladder that looked best online to see which I liked best. The telescoping ladder was a Windline TT-3X Transom Mount Ladder. I bought both from Amazon.
Here is a photo of the removable ladder and the two new ones, Garelick in the middle, Windline on the right:
They are shown at the relative height they would be used on the boat. The Garelick was positioned so it wouldn't stick up “too far” about the transom of the boat. The telescoping ladder was positioned so it would fold up below the lip at the top of the transom. Note the removable ladder extended the farthest into the water followed by the telescoping ladder although the steps of the telescoping ladder came pretty close to matching the steps on the removable ladder. I wanted to use the telescoping ladder but needed to distribute the stress over more of the transom than the stock mounting brackets provided. I designed some larger mounting brackets, purchased a small piece of 12 gauge 316 stainless steel sheet on the internet, and had a local metal working shop cut and bend the two brackets for me. I drilled holes in the new brackets to match the holes in the new ladder:
I bolted the new brackets on to the new ladder and put a backing nut on the bolt that went through the top hole on the ladder. This nut helps spread the stress from the small ladder over the full length of the new bracket and puts less stress on the transom:
With the brackets in place on the telescoping ladder, the stress of the ladder is spread over an area larger than with the Garelick ladder:
To prepare the transom for mounting the new ladder, I essentially followed the process David Scobie described.
I added a West Marine access plate to the starboard cockpit seat behind the lazarette:
Next I made a cardboard template of the plywood backing I would add to the transom:
To get the cardboard to the inside surface of the transom, I found I had to cut it into two pieces. In addition, the upper part of the transom already had some thickness to it. This thickness was apparently foam sandwiched between inside and outside layers of fiberglass. I needed about a ¼ inch thick plywood to fill in below this. My plywood reinforcing for the transom became three pieces of ¼ inch plywood. The smallest one was to fill in for the foam thickness where it wasn't. The two longer pieces were to provide reinforcing over the large area I wanted to beef up. And the medium size pieces was to sort of hold the two longer pieces together:
There is no place around here to get marine grade plywood. I found a scrap of nice 5 ply plywood at the local hardware store and, since I didn't have enough of this nice 5 ply stuff, also got some standard 3 ply CDX plywood. I used the CDX for the small piece that filled in below the foam and the 5 ply for the rest of the pieces. Here is another view of the pieces. They were cut to match the cardboard pieces I had made to fit into the transom:
Generally following David Scobie's process, I epoxied the plywood in place a layer at a time. While the epoxy hardened I held the pieces in place with lengths of wood jammed between the transom and the back of the lazerette and with ropes looped through holes in the plywood and the transom and held tight with more pieces of wood. I found these methods worked pretty well:
Once the plywood was in place, I drilled the mounting holes oversize, filled them with epoxy and re-drilled them. Two of the holes needed to be quite large to accommodate the nuts tightened to the back of the top holes on the ladder. I didn't do a good job with my initial placement of the top holes:
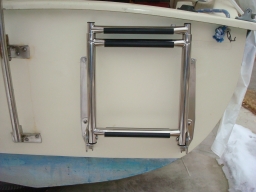
I installed the ladder and drilled a hole through the deck to hull flange at the top of the transom to accept a bolt that is dropped in place to hold the ladder up when stowed. I wrapped a piece of bungee around the bottom rung of the ladder to keep it from rattling on the trailer (bungee not on yet):
I am quite pleased with the installation both deployed and stowed: